How do I set up my Technicolor WiFi 6 router for my 3 or 5 Gbps Full Fibre Broadband connection?
Your Technicolor WiFi 6 router (FGA5330) is jam-packed with great features to help you tailor your home WiFi network to your liking. From customisation to troubleshooting, read on to learn more.
What's covered in this article:
- How do I change my WiFi settings
- How do I enable Parental Controls?
- How do I reboot or reset my device?
- How do I see the signal strength of my connected wireless devices?
- How do I reboot or reset my device?
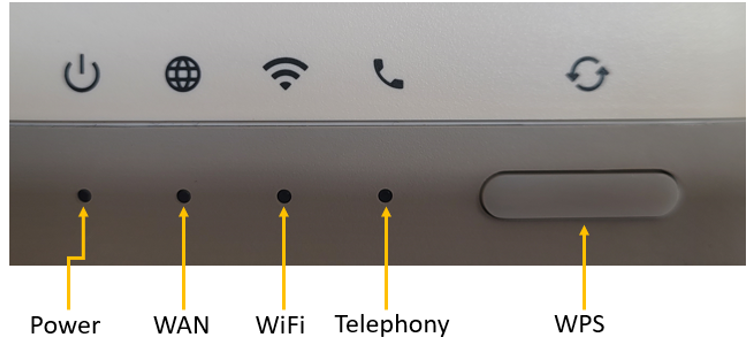
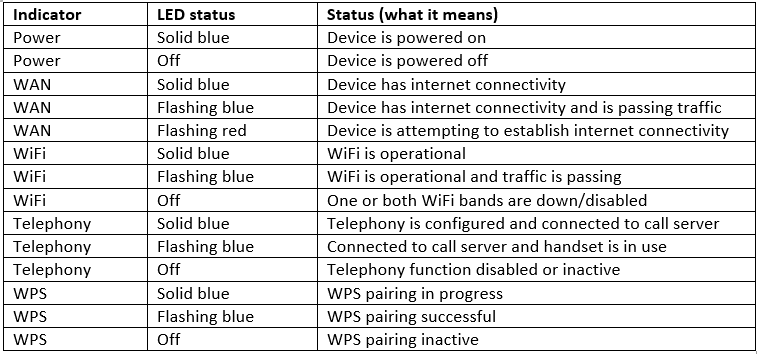
- What do the LED's on my home router mean?
How do I change my WiFi settings (Network name/Passphrase)?
Please follow these steps to change your WiFi network name/SSID:
- Make sure you are connected to the network using either a wired (Ethernet) or WiFi connection;
- Navigate to the home router management page, here;
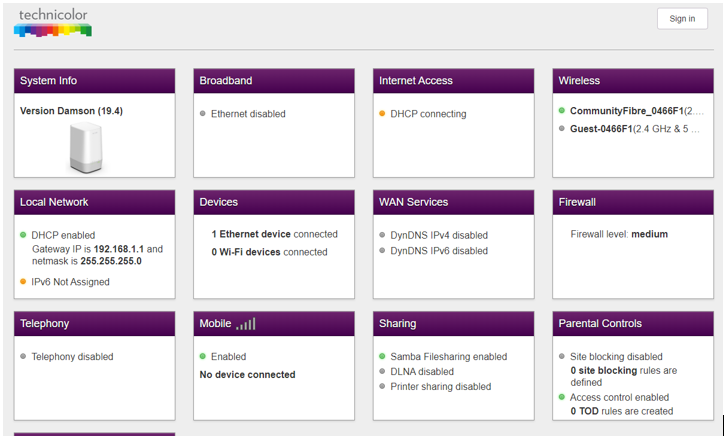
- Then click the 'sign in' button at the top right-hand side of your screen (as shown below).
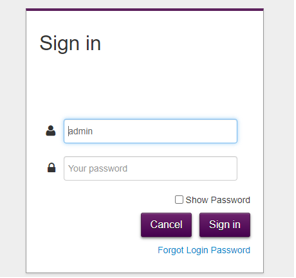
- When prompted, please enter the admin username and password shown at the bottom of your router.5.
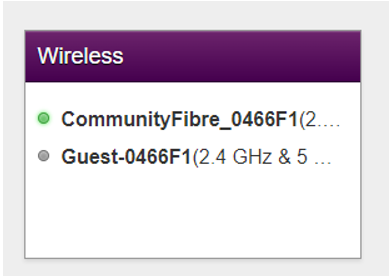
- Once logged, please select the "Wireless" sub-menu from the grid menu (as shown below):
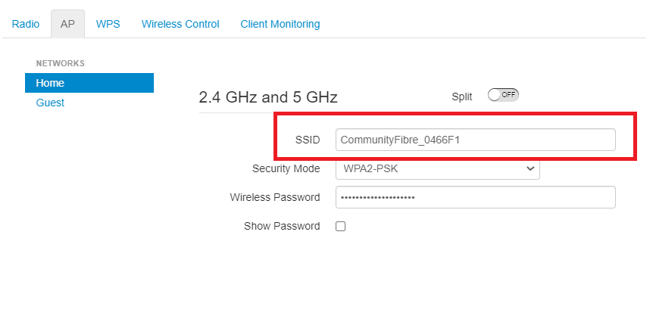
- Ensure you are within the "AP" tab. Then click on the "Home" button on the left and change the network name by editing the "SSID" field (as shown below):
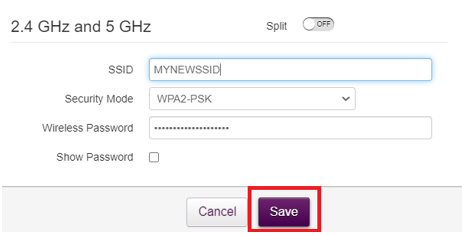
- To apply your changes, please ensure you select the "save" button at the bottom of the sub-menu (as shown below):
Please follow these steps to change your WiFi password:
- Make sure you are connected to the network using either a wired (Ethernet) or WiFi connection;
- Navigate to the home router management page, here;
- Then click the 'sign in' button at the top right-hand side of your screen (as shown below).

- When prompted, please enter the admin username and password shown at the bottom of your router.

- Once logged, please select the "Wireless" sub-menu from the grid menu (as shown below):

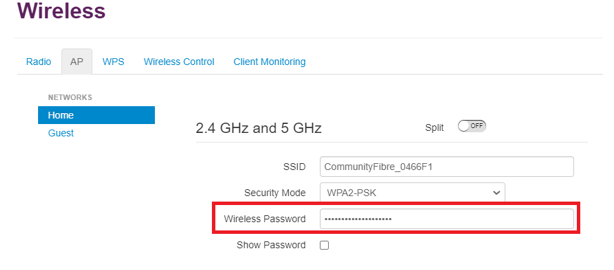
- In the wireless settings sub-menu, ensure you are within the "AP" tab. Then click on the "Home" button on the left and change the wireless passphrase by editing the "Wireless password" field (as shown below):
- To apply your changes, please ensure you select the "save" button at the bottom of the sub-menu (as shown below):

How do I enable Parental Controls?
Please follow these steps to enable website blocking using URL's and keywords:
- Make sure you are connected to the network using either a wired (Ethernet) or WiFi connection;
- Navigate to the home router management page, here;
- Then click the 'sign in' button at the top right-hand side of your screen (as shown below).

4.When prompted, please enter the admin username and password shown at the bottom of your router.

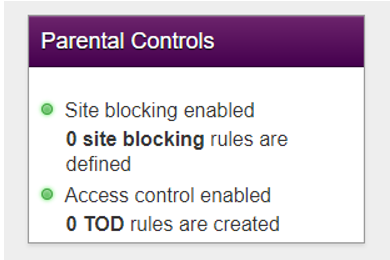
5.Once logged, please select the "Parental Controls" sub-menu from the grid menu (as shown below):
6. If you wish to blog certain keywords rather than URLs/domain names, please jump straight to steps 9 and 10.
7.Block website by URL/domain: You can enable site/domain blocking by clicking the "Enabled" toggle switch to the ON position. Then click "Save" to apply your changes.
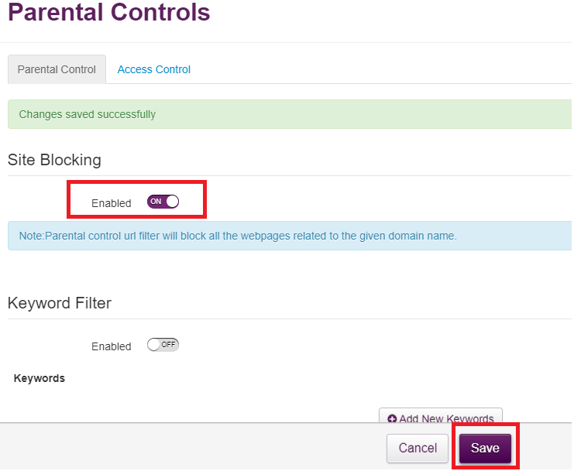
8.Once you have enabled site blocking, you will be able to add new sites/domains to be blocked:
- Click "Add New Site" button,
- Enter the URL of any sites/domains you wish to be blocked,
- Under the "Device" tab, select if this rule should be applied to all or a single device,
- Then click the "+" icon to apply the configuration.

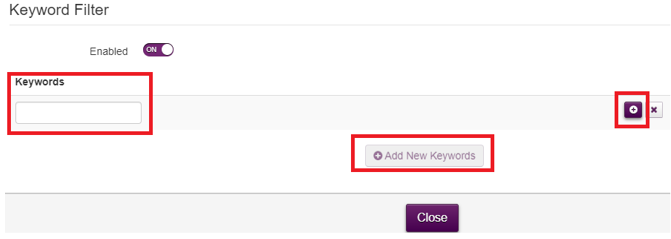
9.Block website by keyword: You can enable keyword filtering by clicking the "Enabled" toggle switch to the ON position. Then click "Save" to apply your changes.

10.Once you have enabled keyword filtering, you will be able to add new words that if matched in the URL of the site being accessed the site will be blocked:
- Click "Add New Keywords" button,
- Enter any keywords you wish to be matched,
- Then click the "+" icon to apply the configuration.
Please follow these steps to enable time of day access control for home devices:
- Make sure you are connected to the network using either a wired (Ethernet) or WiFi connection;
- Navigate to the home router management page, here;
- Then click the 'sign in' button at the top right-hand side of your screen (as shown below).

- When prompted, please enter the admin username and password shown at the bottom of your router.

- Once logged, please select the "Parental Controls" sub-menu from the grid menu (as shown below):

6.Once logged, please select the "Access Control" sub-menu from the grid menu.
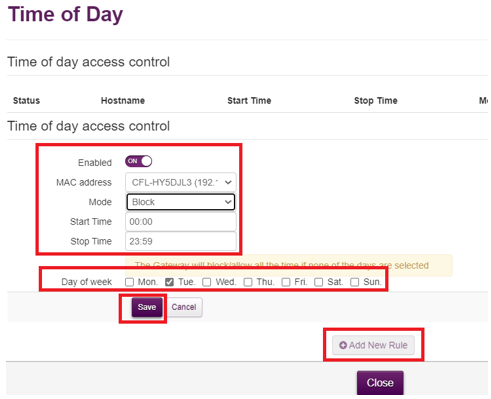
7. To add a new rule:
- Select "Add New Rule",
- Using the "MAC address" dropdown menu, choose the home device you want to restrict,
- From the "Mode" dropdown menu, select whether you want to 'block' or 'allow' the device in the specified time schedule,
- Set your preferred "Start Time", "Stop Time" and "Day of the Week" that the rule should be applied to,
- Click "Save" to confirm your changes.
How to split your WiFi bands (2.4GHz and 5GHz) to improve your coverage:
If you are facing coverage issues when connecting to your WiFi network from a distance (e.g. upstairs or two rooms away). It may be useful for you to split your 2.4GHz and 5GHz bands and connect devices to each of them accordingly.
The 2.4GHz band provides slower maximum speeds but can travel further throughout your home giving you better signal strength further away. The 5GHz band can provide higher maximum speeds but doesn't travel as efficiently throughout most homes and the signal power can be greatly reduced by walls and other objects.
Please see the steps below to split your 2.4GHz & 5GHz bands into two different wireless networks.
- Make sure you are connected to the network using either a wired (Ethernet) or WiFi connection;
- Navigate to the home router management page, here;
- Then click the 'sign in' button at the top right-hand side of your screen (as shown below).

- When prompted, please enter the admin username and password shown at the bottom of your router.

- Once logged, please select the "Wireless" sub-menu from the grid menu (as shown below):

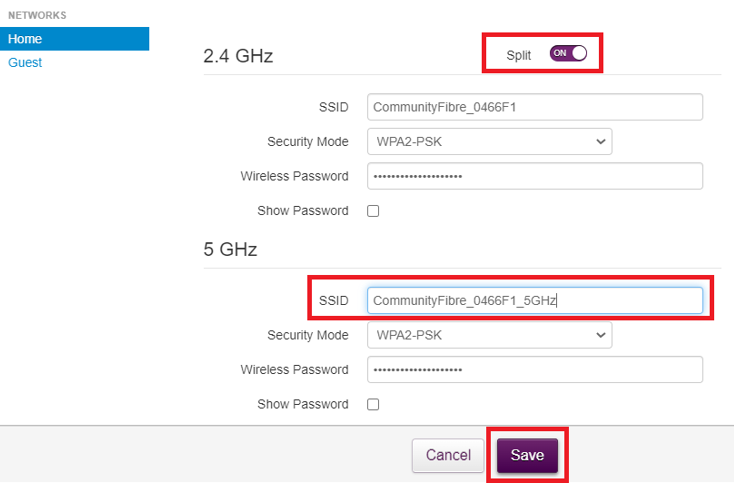
- Ensure you are within the "AP" tab. Then click the "Split" toggle switch to the "ON" position.
- You will now see the 2.4GHz and 5GHz bands appear as two separate SSID's. To avoid confusion between the two when adding new devices, we suggest you add "_5GHz" to the end of the 5GHz band SSID name. Then click "save" to apply your changes.
How do I see the signal strength of my connected wireless devices? At times it may be useful to see the signal strength your wireless home devices have. For instance, when positioning smart home devices or where your broadband equipment should face to get optimum performance.
To check the signal strength of your connected devices:
- Make sure you are connected to the network using either a wired (Ethernet) or WiFi connection;
- Navigate to the home router management page, here;
- Then click the 'sign in' button at the top right-hand side of your screen (as shown below).

- When prompted, please enter the admin username and password shown at the bottom of your router.

- Once logged, please select the "EasyMesh" sub-menu from the grid menu (as shown below):
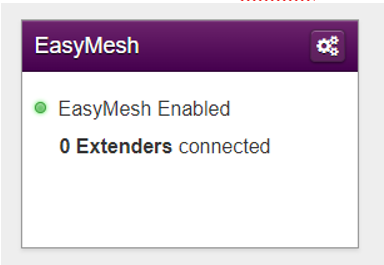
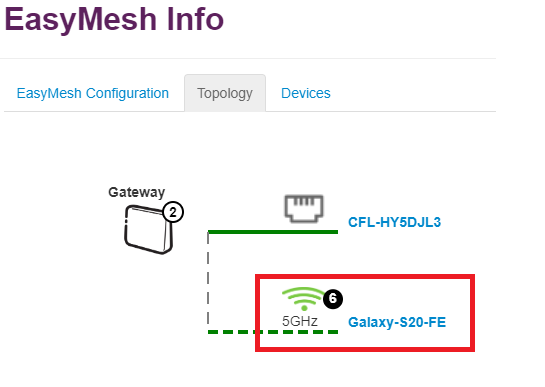
6.Ensure you are within the "Topology" tab, from here you can see all the devices connected to your home router.
7.Your wireless devices will be displayed with either "2.4GHz" or "5GHz" next to them indicating what band your device is connected to. The broken line (shown below) is colour coded and will change between green, yellow and red depending on your devices signal strength. To see the specific Received Signal Strength Indicator (RSSI), hover over the wireless symbol for the device in question.
Understanding the RSSI value measured and displayed in decibel milliwatts (dBm):
- 0dBm <> -30dBm = Very good (device is most likely very close to AP (Access Point)/router).
- -31dBm <> -60dBm = Good (device should get reliable coverage).
- -61dBm <> -70dBm = Okay (reliable for basic use such as browsing the web. However not recommended gaming or streaming etc).
- -71dBm or less = Poor (coverage will tend to be unreliable).
How do I reboot or reset my device?
If you need to improve connectivity to the internet or connectivity with your CPE device, rebooting and/ or factory resetting your CPE device can be a useful troubleshooting tool to try.
To reboot or reset your device:
Press the black button (as shown below). This is a spring-loaded button, and it will pop out when the device is powered off. Leave the button out for at least 15 seconds and then press it again until it clicks back into place. The device should power back on and all the LED's will be lit.
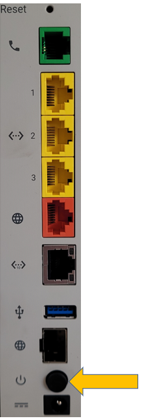
To reset your device to the factory settings: Get a thin sharp object such as a drawing pin and insert it into the "Reset" buttonhole (as shown below) and hold down until all the LED's light up. Wait for the device to complete its reboot cycle and turn itself back on.

Ports explained:

- The yellow ports are for Local Area Network (LAN) connections up to a maximum of 1 Gbps.
- The red port is for a Wide Area Network (WAN) connection up to a maximum of 1 Gbps.
- The silver port <...10...> is for a LAN connection up to a maximum of 10 Gbps., however it will deliver the maximum speed of your 3 Gbps package on the LAN side of the network.
- USB port – to connect a printer or an external hard drive for sharing on the network The Small Form-factor Pluggable (SFP) port is for a WAN connection up to 10 Gbps, but it will deliver the maximum speed of your 3 Gbps package when establishing a connection with the ADTRAN modem
What do the LED's on my home router mean?
