
Port Forwarding - How can I set this up on my Linksys router?
Port forwarding is only available to customers that have a Public IP. To find out more information please see: Is port forwarding available and What IP address will I be assigned
Here is how you can set up port forwarding using the Linksys web interface:
If you have a WiFi 5 or WiFi 6 router (square-shaped on top) follow the options directly below for port forwarding. If you have a WiFi 7 router (droplet-shaped on top), follow the advice further down the page.
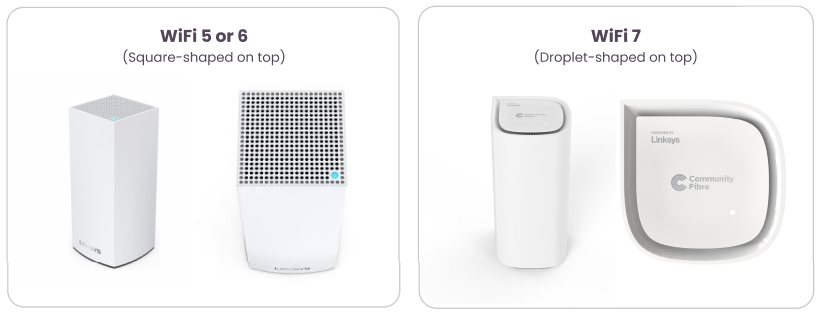
For WiFi 5 or WiFi 6 routers (square-shaped on top)
-
Login to the web interface. Please see article: Linksys Router - How do I login to the web interface
-
On the Navigation pane under Router Settings, select Security.
-
On the Security window, select Apps and Gaming tab. Once done, select the Single Port Forwarding sub-tab and click the Add a new Single Port Forwarding button
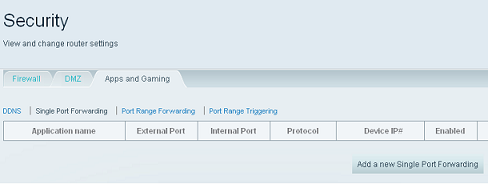
- Enter the details of the device you want to forward. Ensure to enter the Application name, External and Internal Ports, the Protocol to be used, and the Device IP# (the static IP address of your device) correctly. Then, click Save.

In the example below, we will port forward a home camera to enable its remote access feature, this means you can access your monitoring camera even when you’re away from your home network. This camera utilizes Port 80, which is the regular internet port number (HTTPS) so the camera can be accessed over the internet. The 192.168.1.11 represents the camera’s Static IP address.

It is recommended to set the Protocol to the default “Both” option, so it can utilize both TCP and UDP options to ensure smooth and fast connectivity.
- Click Apply then click Ok.
You should now have successfully set up Single Port Forwarding on your Linksys WiFi router.
For WiFi 7 routers (droplet-shaped on top)
-
Login to the Linksys Now web interface. Please see article: Linksys Now - How do I login to the web interface.
-
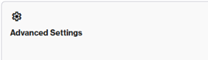
Once logged in, click on ‘Menu’ followed by ‘Advanced Settings’.

-
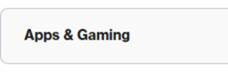
Go to ‘Apps and Gaming’.
-
Depending on the the port requirements, there are 2 options: If you wish to only open one port, click on Single Port Forwarding. If you have multiple ports to forward, click on Port Range Forwarding.

For Single Port Forwarding
-
Click the '+' symbol to add a rule
-
Enter an Application name for the rule (E.g. the device or app for which you want to forward traffic).
-
Enter the Internal Port and External Port numbers.
-
Select whether the rule uses TCP, UDP, or UDP and TCP.
-
Enter the IP address of the device to which you wish to forward the traffic
-
Save your changes

For Port Range Forwarding
-
Click the '+' symbol to add a rule
-
Enter an Application name for the rule.
-
Enter the Start and End Port numbers for the range (the router will apply the rule to all ports within that range).
-
Select TCP, UDP, or UDP and TCP.
-
Enter the IP address of the device to which you wish to forward the traffic
-
Save your changes

Please note: The specific ports you need to forward depend on the device or application. Check the app or device manufacturer’s documentation for the correct port numbers and protocols.

